Hostgator India is a sub branch of Hostgator.com. Hostgator was founded by Brent Oxley in the year of 2002. To expand its international reach, they opened offices in India located in Mumbai and Bangalore.
Now Let us come to the point.
There are mainly three steps to make your website, blog or business online.
- Register Domain name
- Find Web Hosting Provider and Suitable Plan
- Upload your website and make it live.
Step1: How to Register Domain with Hostgator India?
To register your domain name it is necessary to check that whether domain name is available or not. You can check at the time of domain registration.
Go to Hostgator Website and Click on Domains –> Domain Registration.
You will be asked to enter domain name. Then click on Search button.
Then it will show whether domain is available or not. If available then you can make payment and register.
Step 2: How to Select Best Suitable Hosting Plan
I think next big question in your mind is which hosting plan I should select. It depends on your website and website traffic.
There can be mainly two types of hosting. One is Linux hosting and another is Windows hosting.
What to Select – Linux Hosting or Windows Hosting?
Without going to details there is a simple rule that if your website is developed in ASP, ASP.net, IIS or MSSQL, then you can go with Windows hosting. For Websites built with WordPress, simple HTML/CSS or PHP then it is good to go with Linux Hosting.
Now let us compare two of hosting plans that is Linux hosting and windows hosting.
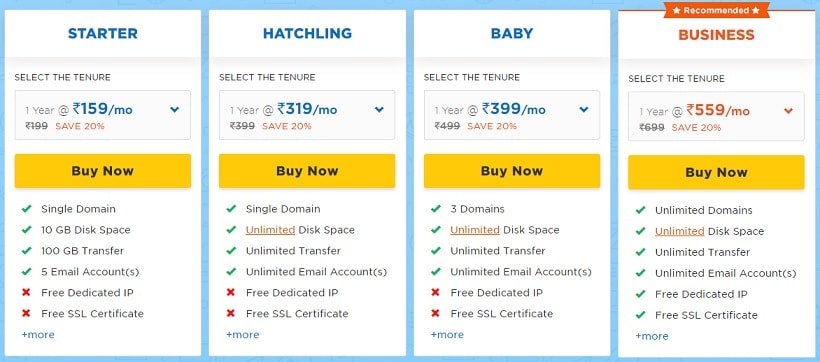
Hostgator India Linux Hosting Plan Comparison
Hostgator plans starts from just Rs.159/month which includes domain, 10GB disk space and 100GB transfer plus 5 email accounts. This is enough for the new website.
If you need dedicated IP and secured SSL Certificate then you can go with HATCHLING plan by adding additional Rs.160/month.
If you are looking to buy this plan then don’t miss the Hostgator Coupon Code India to get up to 70% discount.

Additionally you can also install CMS application likes WordPress, Joomla, Magento and Drupal in just single click.
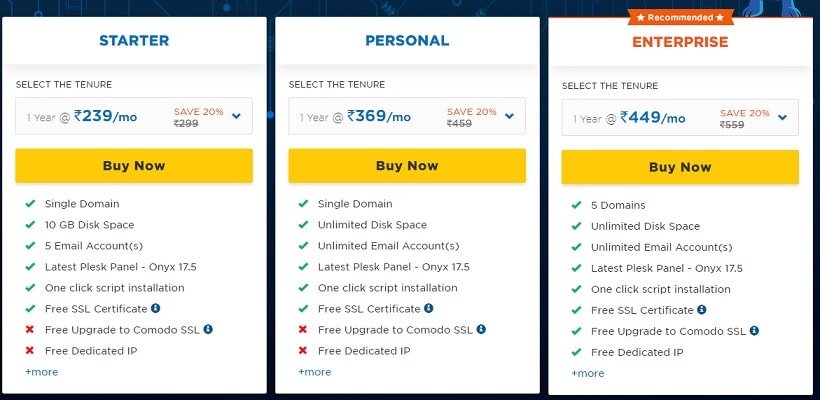
Hostgator India Windows Hosting Plan Comparison
Windows hosting is suitable for applications that requires ASP.NET, MS SQL, and IIS.
You can manage your Windows Shared Hosting and applications on a single server with latest Plesk Onyx 17.5.

As you can see compare to Linux Hosting, Window Hosting is somewhat costly. Basic plan starts with Rs.239/month.
Here additional thing that you will get is FREE SSL Certificate. To provide secure communication between a website and an internet browser you can use SSL Certificate.
Other Hostgator India Hosting Plans
Above mentioned plans are shared hosting plans. But if your website is having good number of traffic then you can go with VPS hosting (For larger websites and apps). Check out Exclusive VPS Promo Code to avail discount.
Hostgator provides various plans starting from shared hosting to WordPress Hosting, VPS hosting, Cloud hosting, Reseller Hosting and Dedicated hosting.
Step 3: Uploading Your Website
To go your website live. You need to upload website files to hosting server.
There are two ways by which you can upload your website. One is by using cPanel’s File Manager and other is via FTP Client like FileZilla.
Uploading Website Using cPanel File Manager
- Log in to your cPanel.
- Click on the icon called File Manager.
- Now Select Web Root and click on Go.
- Finally add website files and folders to public_html.
Uploading Website Using FileZilla (FTP Client)
Simply drag and drop your files into the /public_html/ folder using FileZilla.
You can connect to server via FileZilla by following these steps:
- Install FileZilla and open it. (Download FileZilla)
- Select Site Manager from File Menu.
- Select New Site
- Name the New Site – such as with your real domain name
- Enter website’s IP address in the field marked as FTP Address
- Enter username and password which you received in your email
- Set the Port to 21
- Click on Connect

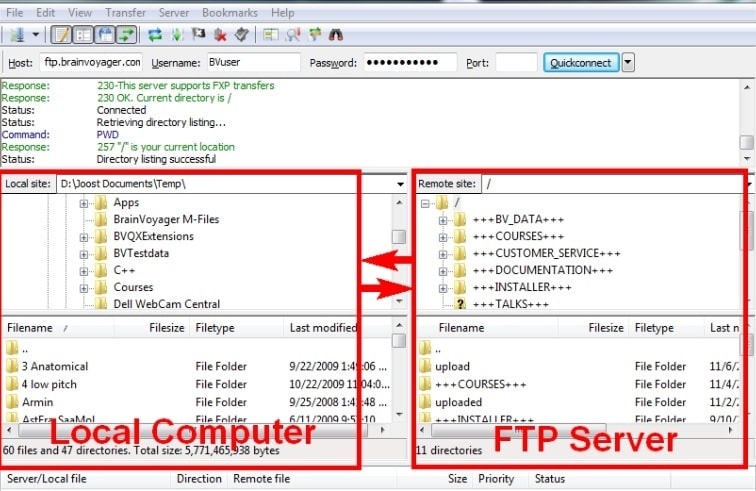
Once FTP is connected, on left side you can see Local computer and Right side Web hosting service.
Now in FileZilla simply drag and drop files and folders from left side local computer to right side server directory.
It starts uploading files and once finished, it will confirm uploading successful.
